Store লেবেলটি সহ পোস্টগুলি দেখানো হচ্ছে৷ সকল পোস্ট দেখান

Which Accounting Software is best for Inventory Management?

Which Accounting Software is best for Inventory Management?
Streamline Your Stock: Discover the Best Accounting Software for Effortless Inventory Management!

Managing inventory efficiently is critical for any business. Poor inventory control can lead to overstocking, stockouts, and inaccurate financial reporting. Choosing the right accounting software for inventory management can streamline operations, save costs, and improve decision-making. In this article, we explore the best accounting software options that help businesses manage their inventory effectively.

Why Inventory Management is Crucial

Inventory management ensures that a business maintains optimal stock levels to meet customer demand while minimizing storage costs. Some key benefits of effective inventory management include:

  • Accurate financial reporting: Integrated inventory in accounting software ensures real-time updates for revenue, cost of goods sold (COGS), and profits.

  • Reduced stockouts and overstocking: Prevent losses from unsold inventory or missed sales.

  • Improved customer satisfaction: Faster order fulfillment with accurate stock levels.

  • Efficient supply chain management: Automated reordering and tracking reduce manual errors.

Features to Look for in Accounting Software for Inventory

When choosing the best accounting software for inventory management, consider these essential features:

When selecting accounting software that supports inventory management, it's essential to choose a solution with robust features that align with your business needs. Below are the most important features to look for, along with their benefits:

1. Real-Time Inventory Tracking

  • Live stock updates: Your software should reflect inventory changes immediately as sales, purchases, or adjustments occur. This helps prevent overstocking or stockouts. 

  • Location visibility: Support for tracking inventory across different warehouses or sales channels. 

  • Barcode or RFID scanning: Use barcode scanning or RFID to quickly scan items, improving accuracy and reducing manual data entry errors. 

2. Automated Reordering / Replenishment

  • Reorder point alerts: The system should let you set minimum stock thresholds to trigger alerts or even automatically generate purchase orders. 

  • Supplier integration: Ability to tie with your suppliers’ data so reorders are smarter and more accurate. 

  • Demand-based planning: Use historical sales data to forecast demand and decide how much to reorder. 

3. Multi-Location and Warehouse Management

  • Inventory across sites: Track inventory in multiple locations or warehouses, so you always know where stock is held. 

  • Bin or shelf management: Support for detailed warehouse structure (bins, racks, sublocations) to improve picking efficiency. 

  • Centralized inventory view: A unified dashboard that shows total stock and location-wise breakdowns. 

4. Batch, Serial, and Lot Tracking

  • Serial / lot numbers: Ability to record and track inventory by serial numbers or lot numbers for traceability. 

  • Expiry tracking: For perishables or regulated goods, track expiry dates or shelf life. SelectHub

  • Traceability: Complete transaction history (inbound, outbound) for each batch or serial for compliance, recalls, or audits. 

5. Cycle Counting & Inventory Auditing

  • Cycle counting: Support regular, scheduled checks of inventory subsets to improve accuracy without shutting down operations. 

  • Audit trails: Software should keep a full log of inventory adjustments, user actions, and stock changes. 

  • Variance reporting: Compare system inventory vs physical counts to identify discrepancies like theft, damage, or miscounts. 

6. Forecasting & Demand Planning

  • Predictive analytics: Use past sales data, seasonality, and trends to estimate future demand. Safety stock calculation: Automatically compute safety stock levels based on lead times, demand variability, and other factors.

  • Scenario planning: Reflect “what-if” situations (e.g., supplier delays, demand surge) to plan buffer inventory.

7. Reporting & Analytics

  • Customizable reports: Generate detailed reports on stock movement, turnover, profitability, slow-moving items, etc. 

  • Dashboards: Visual dashboards for real-time insights into inventory KPIs (e.g., on-hand stock, reorder status). 

  • Variance & trend analysis: Identify patterns such as shrinkage, write-offs, and demand trends. TechTarget

8. Integration with Accounting & Other Systems

  • Seamless syncing: Inventory changes should automatically update cost of goods sold (COGS), balance sheet, and P&L in your accounting module. E-commerce & POS integration: Sync inventory with sales channels like online stores, marketplaces, or POS systems. 

  • Third-party logistics (3PL): Integration with external warehouses and logistics partners for more efficient stock management. 

9. Alerts & Notifications

  • Low-stock alerts: Automated notifications when items hit reorder points. 

  • Expiry warnings: Alerts for products nearing expiration or falling below quality thresholds. 

  • Supplier lead time alerts: Notifications if a supplier delay could impact inventory replenishment.

10. Scalability & Flexibility

  • Scalable architecture: Ability to handle more SKUs, locations, users as your business grows. 

  • Custom workflows: Support for customizing modules, fields, and processes to match your business logic. 

  • Cloud-based vs on-premise: Depending on your needs, choose cloud solutions for flexibility or on-premise for tighter control. 

11. Security & Access Control

  • User permissions: Role-based access to restrict who can view or modify inventory data. 

  • Data encryption & backups: Protect inventory and financial data with security best practices.

  • Audit logs: Track user actions around inventory transactions for accountability and compliance.

12. Mobile Access

  • Mobile app or responsive UI: Make inventory updates, scans, and checks from mobile devices. 

  • Offline mode: For warehouses with weak connectivity, allow offline updates that sync when online.

Why These Features Matter

  • Accuracy: Real-time tracking, cycle counting, and barcode scanning reduce human error and help keep stock data accurate.

  • Efficiency: Automated reordering, mobile access, and integration save time and reduce manual tasks.

  • Cost Savings: Avoid overstocking and stockouts; optimize inventory levels; reduce holding costs.

  • Scalability: As your business grows, you need software that can scale — these features help ensure your system doesn’t become a roadblock.

  • Compliance & Traceability: For regulated industries or businesses that need comprehensive audit trails, features like lot tracking and variance reporting are essential.

Top Accounting Software for Inventory Management

1. QuickBooks Online

Best for small to medium businesses

  • Real-time inventory tracking and reporting.

  • Integration with eCommerce platforms like Shopify and Amazon.

  • Automated stock alerts and reorder points.

  • User-friendly interface suitable for beginners.

2. Zoho Books

Ideal for growing businesses

  • Tracks inventory in multiple warehouses.

  • Supports batch tracking, serial numbers, and expiry dates.

  • Detailed inventory reports and dashboards.

  • Integrates with Zoho CRM and other Zoho apps.

3. Xero

Perfect for cloud-based inventory control

  • Multi-currency support for international businesses.

  • Inventory tracking tied to invoices and purchase orders.

  • Integration with apps like DEAR Inventory for advanced inventory management.

  • Comprehensive financial reporting.

4. NetSuite ERP

Best for large enterprises

  • Cloud-based ERP with integrated accounting and inventory.

  • Real-time inventory visibility across locations.

  • Advanced forecasting, demand planning, and automated replenishment.

  • Suitable for complex supply chains and high-volume businesses.

5. Odoo

Highly customizable for all business sizes

  • Integrated accounting, inventory, and warehouse management.

  • Supports barcode scanning, batch picking, and automated reordering.

  • Open-source flexibility for tailored inventory processes.

  • Strong reporting and analytics capabilities.

How to Choose the Right Accounting Software for Your Business

To pick the best solution, follow these steps:

Selecting the right accounting software is a pivotal decision for your business. The ideal solution not only manages your current bookkeeping and financial tasks but also supports growth, integrates with your operations, and adapts as your business evolves. Below is a step‑by‑step guide to make this choice easier.

1. Assess Your Business Needs

Start by evaluating your business’s specific requirements.

  • Business size & structure: Are you a sole proprietor, an SMB, or a larger enterprise? The scope of your operations will influence the type of software you need. 

  • Key accounting functions: What are your pain points? Do you need strong invoicing, expense tracking, payroll, or inventory management? Match the software to your needs. 

  • Industry‑specific demands: Depending on your sector (retail, manufacturing, service‑based, e‑commerce), you may require specialised features (e.g., inventory or project costing). 

  • Growth trajectory: Choose software that can scale — you don’t want to outgrow it too quickly. 

2. Define Your Feature Requirements

Once you know your needs, list the core features the software must include.

  • Usability & interface: A user‑friendly design is crucial so your team can use it effectively without excessive training. Integration capabilities: The software should integrate with other systems you use (CRMs, e‑commerce, inventory, payroll) so data flows smoothly. 

  • Automation & reporting: Look for automation of routine tasks (invoicing, reconciliation) and strong reporting/analytics to support decision‑making. 

  • Scalability & flexibility: The ability to add users, locations, or modules without major change is a big plus. 

  • Security & compliance: Financial data is sensitive; ensure the software provides robust security and supports regulatory requirements.

3. Consider Cost & Budget

Affordability matters — not just the upfront cost, but the total cost of ownership.

  • Pricing models: Subscription vs one‑time license; check for hidden costs (setup, training, additional users/modules). 

  • Value vs features: Don’t pay for features you’ll never use. Pick something aligned with your actual needs. 

  • Long‑term costs: Consider how adding users, modules, or extra storage may increase cost over time. 

4. Evaluate Vendor Support & Implementation

The best software isn’t just features—it’s how well you can implement and support it.

  • Training & resources: Does the vendor provide tutorials, documentation, onboarding support? 

  • Customer support quality: Good support matters when you run into issues.

  • Migration & data import: If you’re moving from old software or spreadsheets, check how easy the transition will be.

  • Trial or demo available: A free trial or demo helps test usability and fit before committing. 

5. Test & Make Decision

Put your shortlisted options through practical tests before full adoption.

  • Trial run: Use the software with real data or a sample to see how workflow and reporting feel.

  • User feedback: Involve key users (finance team, operations) to test usability and functionality.

  • Performance review: How quickly can you generate key reports? How easy is integration with your systems?

  • Check reviews & references: What are other businesses saying about the vendor’s reliability and support? 

6. Plan for Roll‑out & Growth

Once you select software, plan its implementation and future use.

  • Phased roll‑out: Consider starting with core modules, then adding advanced features (like inventory, multi‑currency) later.

  • Future‑proofing: Ensure your choice will meet your needs as you expand (new markets, more users, complex transactions).

  • Regular review: Revisit the software periodically to ensure it still meets your evolving business needs; adjust if necessary.

Conclusion

Choosing the right accounting software is a strategic decision that extends beyond mere bookkeeping. By assessing your business needs, defining essential features, weighing cost versus value, evaluating vendor support, and testing before committing, you’ll be better positioned to select a solution that drives efficiency, supports growth, and adapts with your business.

Investing effort upfront in selecting the right tool can save significant time, money, and frustration in the long run.

Choosing the right accounting software for inventory management can transform the way your business operates. From small businesses to large enterprises, there’s a solution available for every need. QuickBooks and Zoho Books are great for SMBs, while NetSuite and Odoo suit larger or growing companies.

Investing in the right software ensures accurate inventory tracking, seamless accounting, and smarter business decisions.

What is Fabric Grouping in Textile?

Fabric Grouping is an essential process in the Garment Manufacturing Industry that involves organizing fabrics based on their shared characteristics. Whether you're a fashion designer, manufacturer, or textile retailer, understanding fabric grouping can streamline production, improve inventory management, and enhance overall quality control.

In this blog, we’ll break down what fabric grouping is, why it’s important, and how it benefits the garment production process.

What is Fabric Grouping? A Guide for Garment Manufacturers


What is Fabric Grouping?

Fabric grouping refers to the categorization of fabrics according to their common attributes such as:

  • Type (cotton, polyester, silk, etc.)
  • Weight (lightweight, medium, heavyweight)
  • Color (light, dark, neutral tones)
  • Usage (formal wear, sportswear, casual wear)
  • Texture and structure (knits vs. woven)

By grouping fabrics with similar characteristics, manufacturers and designers can ensure uniformity in production, quality control, and inventory management.

Why is Fabric Grouping Important?

  1. Improved Production Efficiency

    Grouping fabrics by weight, type, or structure helps streamline the production process. For example, lightweight fabrics can be cut together, saving time and effort. Fabrics with similar properties can also undergo the same sewing, dyeing, and finishing processes, reducing production errors and maintaining consistency.

  2. Enhanced Quality Control

    Fabric grouping allows manufacturers to apply consistent quality control checks. Fabrics within the same group are tested for issues such as durability, shrinkage, and color fastness. This ensures that all garments produced from the same fabric group meet the same quality standards.

  3. Simplified Design Process

    Designers benefit from fabric grouping because it simplifies fabric selection for various projects. For instance, a designer can easily access grouped fabrics for winter collections (heavier weight fabrics) or summer lines (lighter, breathable fabrics). Grouping also helps designers stay within a specific color palette or theme.

  4. Effective Inventory Management

    Grouping fabrics helps businesses maintain organized inventories. By tracking different fabric groups, manufacturers can quickly identify which fabrics are in stock, need reordering, or are no longer available. This reduces overstocking and minimizes production delays due to material shortages.

  5. Cost Management

    Fabric grouping can also aid in controlling production costs. By grouping fabrics by price range, businesses can manage budgets more effectively and make informed purchasing decisions.

Common Methods of Fabric Grouping

  1. By Fabric Type

    Fabrics are grouped based on their material, such as cotton, polyester, linen, silk, and wool. This helps manufacturers tailor production techniques to the specific material.

  2. By Fabric Weight

    Fabrics are categorized by weight (light, medium, heavy), which affects how the fabric drapes and feels. Lightweight fabrics like chiffon are ideal for summer, while heavier fabrics like wool are perfect for winter.

  3. By Color and Pattern

    Fabrics are often grouped by color or patterns for easy reference when working on seasonal collections or themed garments.

  4. By Usage or Function

    Some fabrics are grouped based on their functionality, such as activewear fabrics, formalwear fabrics, or outdoor performance materials. This makes it easier for designers to choose fabrics suitable for specific garments.

  5. By Fabric Structure

    Knits and woven are often grouped separately due to their different construction methods. Knits are stretchy and comfortable, while woven offer more structure and durability.

Benefits of Fabric Grouping

  • Consistency in production
  • Streamlined fabric selection for designers
  • Reduced production errors
  • Efficient use of materials
  • Enhanced organization of fabric inventory

Conclusion

Fabric grouping is a vital process in garment manufacturing that ensures efficient production, quality control, and seamless design planning. By organizing fabrics based on their characteristics, manufacturers can optimize operations, reduce costs, and improve the overall quality of their products.

Whether you're in the early stages of planning a collection or managing large-scale production, fabric grouping is a key strategy for achieving success in the textile and fashion industry.

Fabrics Quality Ensuring Process in Textile Industry?

Ensuring Fabric Quality in the Textile Industry is a critical process that involves multiple steps to verify that the fabric meets the required standards for various attributes such as strength, color, texture, and durability. 

What is Fabrics Quality Ensuring Process in Textile Industry?

Here’s a detailed breakdown of the fabrics quality ensuring process in the textile industry:

1. Raw Material Inspection

  • Fiber Quality Testing: Before fabric production begins, the quality of raw fibers (e.g., cotton, polyester, wool) is tested. This includes checking fiber length, strength, fineness, and cleanliness.
  • Yarn Quality Testing: For woven or knitted fabrics, the quality of yarns is tested for parameters like strength, uniformity, twist, and moisture content.

2. Fabric Inspection During Production

  • Inline Inspection: Continuous monitoring and inspection are conducted during the fabric production process (weaving, knitting, dyeing, etc.) to catch defects early. Common defects to look for include weaving faults (e.g., broken ends, missing picks), knitting defects (e.g., dropped stitches), and dyeing inconsistencies.
  • Process Control: Implementing strict process control measures ensures that each step of fabric production adheres to quality standards. This includes monitoring machine settings, environmental conditions (e.g., temperature, humidity), and chemical use.

3. Fabric Testing and Evaluation

  • Physical Testing: After production, fabrics undergo various physical tests to evaluate their properties:
    • Tensile Strength: Measures the force required to break the fabric and assesses its durability.
    • Tear Strength: Determines how easily the fabric tears, which is crucial for garments subject to stress.
    • Abrasion Resistance: Tests the fabric’s ability to withstand surface wear from rubbing.
    • Pilling Resistance: Assesses the fabric's tendency to form small balls of fiber on the surface due to wear.
    • Shrinkage Test: Determines how much the fabric shrinks after washing, which is important for maintaining garment size.
  • Colorfastness Testing: This includes various tests to ensure the fabric retains its color under different conditions:
    • Colorfastness to Washing: Checks if the fabric’s color fades or bleeds during laundering.
    • Colorfastness to Rubbing: Evaluates if the color rubs off onto other materials.
    • Colorfastness to Light: Assesses how the fabric’s color holds up when exposed to light, particularly sunlight.
  • Chemical Testing: Tests for the presence of harmful chemicals or finishes that could affect fabric safety or compliance with environmental standards (e.g., formaldehyde, azo dyes).

4. Visual Inspection

  • Manual Inspection: Experienced inspectors visually examine the fabric for defects such as stains, color variations, holes, and other surface flaws. This is often done on a fabric inspection machine that rolls the fabric out for easy viewing.
  • Grading: Fabrics are graded based on the type, number, and severity of defects found. Fabrics that meet quality standards are approved, while those with unacceptable defects may be rejected or downgraded.

5. Measurement and Dimensional Checks

  • Fabric Width and Length: Ensuring that the fabric meets the specified width and length requirements.
  • GSM (Grams per Square Meter): Measuring the fabric’s weight per unit area to ensure consistency and meet the specifications.

6. Finished Fabric Inspection

  • Final Inspection: Once the fabric has been processed (e.g., dyed, finished), a final inspection is conducted to check for any post-production defects such as uneven dyeing, improper finishing, or inconsistencies in texture or hand feel.
  • Lot/Batch Testing: Testing a sample from each production lot or batch to ensure consistency across the entire production run.

7. Packaging and Storage Inspection

  • Packaging Quality: Ensuring that the fabric is packaged in a way that prevents damage during transportation and storage. This includes checking for proper wrapping, labeling, and the use of appropriate protective materials.
  • Storage Conditions: Monitoring storage conditions (e.g., temperature, humidity) to prevent issues like mildew, discoloration, or fiber degradation.

8. Quality Documentation and Certification

  • Test Reports: Documentation of all tests and inspections conducted on the fabric, including test results, methods used, and any corrective actions taken.
  • Compliance Certification: Ensuring that the fabric complies with relevant industry standards (e.g., ISO, ASTM) and obtaining necessary certifications for quality and safety.

9. Continuous Improvement

  • Feedback Loop: Implementing a feedback loop where results from fabric quality tests are used to improve future production processes.
  • Supplier Quality Management: Working closely with suppliers to ensure consistent quality of raw materials and intermediate products.

Conclusion

The Fabric Quality Ensuring Process in the Textile Industry is a comprehensive approach that involves multiple stages of inspection, testing, and control. By rigorously following these steps, textile manufacturers can produce fabrics that meet the highest standards of quality, ensuring customer satisfaction and compliance with industry regulations.

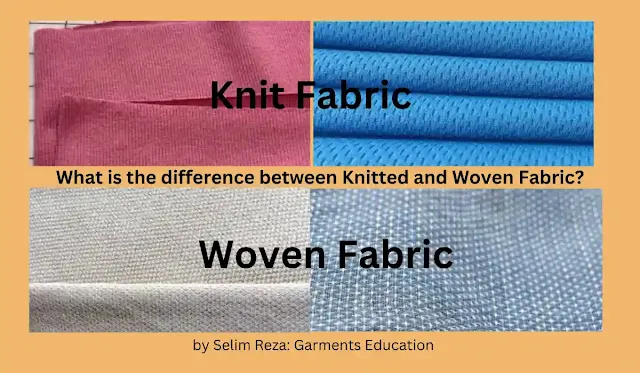
Difference between Knitted and Woven Fabric?

Knitted and Woven Fabrics are two primary types of fabric constructions used in the textile industry, and they differ significantly in their structure, characteristics, and uses. 


What is the difference between Knitted and Woven Fabric?

Here’s a comparison between the two:

1. Structure and Construction

  • Knitted Fabric:

    • Construction: Created by inter looping yarns using needles. The loops of yarn form rows (courses) and columns (wales), giving the fabric its stretchy nature.
    • Flexibility: More flexible and elastic due to the looped structure, which allows the fabric to stretch in multiple directions (depending on the type of knit).

  • Woven Fabric:

    • Construction: Made by interlacing two sets of yarns at right angles to each other – the warp (vertical yarns) and the weft (horizontal yarns). This crisscross pattern creates a more rigid structure.
    • Stability: Less flexible and more stable, with limited stretch (mainly along the bias, or diagonal direction). Woven fabrics generally hold their shape better than knits.

2. Stretchability

  • Knitted Fabric:

    • High Stretchability: Can stretch both horizontally and vertically, making it comfortable for close-fitting garments like t-shirts, leggings, and underwear.
    • Recovery: Often returns to its original shape after being stretched, especially in fabrics with elastane (spandex) content.

  • Woven Fabric:

    • Limited Stretch: Typically does not stretch unless the fabric includes elastane or is cut on the bias. The lack of stretch makes woven fabrics ideal for structured garments like trousers, blazers, and dress shirts.
    • Rigid Structure: Holds its shape well but can wrinkle or crease more easily compared to knits.

3. Breathability and Comfort

  • Knitted Fabric:

    • Breathability: Generally more breathable due to the open, porous structure created by the loops, allowing air to circulate more freely.
    • Softness: Typically softer and more comfortable to wear, making it suitable for casual wear and clothing that requires ease of movement.

  • Woven Fabric:

    • Breathability: Can be less breathable, especially if the weave is tight, though this varies depending on the type of weave (e.g., twill, satin).
    • Crispness: Often feels crisper or firmer, making it ideal for garments that need to maintain a polished, formal look.

4. Durability

  • Knitted Fabric:

    • Durability: Generally less durable than woven fabrics because the loops can snag, pull, or unravel, leading to holes or runs in the fabric.
    • Pilling: More prone to pilling (formation of small balls of fiber on the surface) due to friction.

  • Woven Fabric:

    • Durability: Typically more durable and resistant to wear and tear, as the tight interlacing of yarns provides strength.
    • Resistance to Pilling: Less likely to pill compared to knits, especially in high-quality weaves.

5. Uses and Applications

  • Knitted Fabric:

    • Clothing: Commonly used in garments that require flexibility and comfort, such as t-shirts, sweatshirts, underwear, socks, activewear, and sweaters.
    • Home Textiles: Used in items like blankets, sheets, and knitted throws.
    • Technical Textiles: Often used in stretchable medical textiles, sportswear, and other functional clothing due to its elasticity.

  • Woven Fabric:

    • Clothing: Ideal for structured garments like jeans, trousers, shirts, jackets, dresses, and suits, where stability and shape retention are important.
    • Home Textiles: Widely used for upholstery, curtains, bed linens, and tablecloths.
    • Industrial Uses: Employed in making durable items like tents, sails, and protective clothing.

6. Fabric Weight and Drape

    • Weight: Typically lighter and more flexible, resulting in a fabric that drapes well over the body, conforming to its shape.
    • Drape: Has a softer drape, making it ideal for garments that require a fluid, relaxed silhouette.

  • Woven Fabric:

    • Weight: Can vary widely, from lightweight chiffons to heavy denims, but generally has a more substantial feel.
    • Drape: Depending on the weave and weight, woven fabrics can either drape well or be more rigid, creating structured, tailored looks.

7. Care and Maintenance

  • Knitted Fabric:

    • Care: Often requires gentle washing and care to avoid stretching or distortion. Some knits are prone to shrinking or losing shape if not handled properly.
    • Maintenance: May need special handling to prevent snags or pilling.

  • Woven Fabric:

    • Care: Typically easier to care for, though it depends on the fiber content. Woven fabrics can generally withstand more rigorous washing and ironing.
    • Maintenance: Holds up well over time, though some weaves (like linen) may require frequent ironing to maintain a smooth appearance.

8. Cost and Production

  • Knitted Fabric:

    • Cost: Can be more cost-effective to produce, especially for items made in bulk, as knitting machines can produce fabric continuously.
    • Production Time: Generally faster to produce and can be made in a seamless, tubular form, reducing waste.

  • Woven Fabric:

    • Cost: Can be more expensive to produce, especially for intricate weaves or high-quality materials.
    • Production Time: Takes longer to produce due to the weaving process and may involve more complex machinery.


Summary:

Knitted fabrics are known for their stretchability, comfort, and softness, making them ideal for casual and form-fitting garments. Woven fabrics, on the other hand, are valued for their durability, structure, and versatility, making them suitable for a wide range of applications, from formal wear to home textiles. The choice between knitted and woven fabrics depends on the specific requirements of the garment or textile product.

How are Labels Attached to Clothes?

Labels are an essential part of Clothing, Providing Information about the brand, size, care instructions, and materials. There are several methods to attach labels to clothes, each suited to different types of garments and labels. 

How are Labels Attached to Clothes?

Here’s how labels are typically attached:

1. Sewing

  • Top Stitching: The label is placed on the inside or outside of the garment, and the edges are sewn directly onto the fabric. This method is common for brand labels on the back of necklines or waistband areas.
  • Edge Stitching: The label is attached by stitching along its edges, leaving the middle part of the label free. This method is often used for care labels or tags on the side seams.
  • Loop Label: A label is folded in half and sewn into a seam, with the fold at the top, allowing the label to hang freely. This is commonly seen in neck labels.
  • Hem Label: A small label is sewn into the hem of the garment, often for branding or size tags.

2. Heat Transfer

  • Heat-Pressed Labels: A label is printed onto a special paper or film and then transferred to the garment using heat and pressure. The label bonds directly to the fabric, creating a smooth, tag less finish. This method is popular for care labels, brand logos, and size labels on casual wear, sportswear, and underwear.
  • Iron-On Labels: Similar to heat-pressed labels but usually applied with a household iron. They are common in personalized clothing or children’s wear.

3. Adhesive Labels

  • Sticky Back Labels: These labels have a self-adhesive backing that sticks to the fabric. They are generally temporary and used for size stickers or promotional tags. Not commonly used for permanent labels due to their potential to peel off.
  • Heat-Seal Adhesive Labels: These labels have a special adhesive that activates with heat. Once heat is applied, the label sticks to the garment permanently. This method is used for high-quality brand or care labels, especially on delicate fabrics.

4. Embroidered Labels

  • Direct Embroidery: The label information is directly embroidered onto the fabric of the garment. This is a permanent and durable method, often used for logos, brand names, or size indicators on premium or custom garments.
  • Embroidered Patches: A label is created as an embroidered patch and then sewn or heat-sealed onto the garment. This method is common for branding on outerwear, uniforms, or high-end clothing.

5. Laser Printing

  • Laser Cut and Printed Labels: Labels are laser cut and printed directly onto the fabric or a separate label piece, which is then sewn or heat-sealed onto the garment. This method is precise and durable, often used for branding or decorative labels.

6. Sonic Bonding

  • Ultrasonic Label Attachment: A label is attached to the garment using ultrasonic sound waves, which melt the fibers together, creating a bond without the need for stitching. This method is used for attaching labels to synthetic fabrics and is common in activewear and seamless garments.

7. Snap-On or Button-On Labels

  • Snap or Button Labels: Labels are attached using small snaps or buttons. This method allows the label to be easily removed or replaced, commonly used in workwear, children’s clothing, or garments where the label may need frequent changing (e.g., for laundering).

8. Velcro Labels

  • Velcro-Attached Labels: Labels are attached using Velcro strips, allowing them to be removed and reattached as needed. This method is less common but used in specialized clothing where label information might change frequently.

9. Hang Tags

  • Temporary Hang Tags: These are labels attached with string, plastic fasteners, or pins. They are typically used for pricing, branding, or promotional information and are removed before the garment is worn.

10. Bonding Tape

  • Fusible Bonding Tape: Labels are attached using fusible bonding tape, which adheres the label to the garment with heat. This method is often used in mass production for attaching care labels or brand tags to fabrics that can tolerate heat.

Considerations:

  • Type of Fabric: The method of attachment often depends on the fabric type. For example, heat transfer is suitable for smooth, synthetic fabrics, while sewing is preferred for heavier, natural fabrics.
  • Label Material: The material of the label itself (e.g., woven, printed, embroidered) will also determine the best method of attachment.
  • Durability Needs: Labels that need to withstand heavy wear or frequent washing, like those on sportswear, may require more secure attachment methods like sewing or heat sealing.
  • Aesthetics: The visual appeal of the label on the garment plays a role in choosing the attachment method, especially for branding purposes.


Each method has its advantages, and the choice depends on factors such as the type of garment, the intended use of the label, and the desired durability and finish.

Process of Fabric Inspection in Apparels/Textile?

Inspecting Fabric rolls in a Garment Factory is a crucial step to ensure the quality of the final product. 


What is the process of fabric inspection in Apparels/Textile?

What is the process of fabric inspection in Apparels/Textile? Here’s a step-by-step guide on how to inspect fabric rolls effectively:

1. Preparation
  • Set Up a Proper Inspection Area: Ensure the inspection area is clean, well-lit, and free from dust and debris. A fabric inspection machine or table with backlighting can help in identifying defects.
  • Gather Necessary Tools: You'll need tools like measuring tapes, markers or chalk, defect tags, a notepad or inspection form, and possibly a fabric inspection machine.

2. Visual Inspection

  • Check for Surface Defects: Unroll the fabric partially on the inspection table. Inspect both sides of the fabric for defects like holes, stains, uneven dyeing, slubs, or misprints.
  • Examine the Selvage: Check the fabric’s edges (selvage) for irregularities such as fraying or curling.
  • Review Fabric Consistency: Look for consistency in color and texture across the entire roll. Compare it to a control sample, if available.

3. Measure Fabric Dimensions

  • Check Fabric Width: Measure the width of the fabric at several points to ensure it matches the specified dimensions.
  • Verify Fabric Length: Roll out the entire length of the fabric and measure it to ensure it meets the required yardage or meterage.

4. Conduct Quality Tests (If Required)

  • Shrinkage Test: Cut a small piece of fabric, wash it, and measure again to check for shrinkage.
  • Color Fastness Test: Rub the fabric with a damp cloth to see if the color transfers. You can also expose a small piece to light to test for fading.
  • Strength Test: Perform a tensile strength test, if necessary, to ensure the fabric can withstand stress without tearing.

5. Document Findings

  • Record Defects: Note the type, location, and severity of any defects found. Use defect tags to mark the spots on the fabric roll.
  • Grade the Fabric: Based on the defects found, grade the fabric according to the factory’s grading system (e.g., A, B, C grades).

6. Decide on Acceptance or Rejection

  • Acceptance Criteria: Determine if the fabric roll meets the factory’s quality standards. If the defects are minor and can be corrected or overlooked, the fabric may be accepted.
  • Rejection: If the fabric does not meet quality standards, reject the roll and communicate with the supplier for a replacement or correction.

7. Final Steps

  • Label the Roll: Once the inspection is complete, label the roll with an inspection tag indicating whether it has been accepted, rejected, or requires further action.
  • Store or Return: If accepted, move the fabric roll to the storage area. If rejected, prepare it for return to the supplier.

Tips:

  • Use a 4-Point System: This is a common fabric inspection method where points are assigned based on the size and severity of defects. It helps in standardizing the inspection process.
  • Regular Training: Ensure that all personnel involved in the inspection process are regularly trained on updated inspection techniques and standards.

Following these steps will help you maintain consistent quality control over the fabric used in garment production.


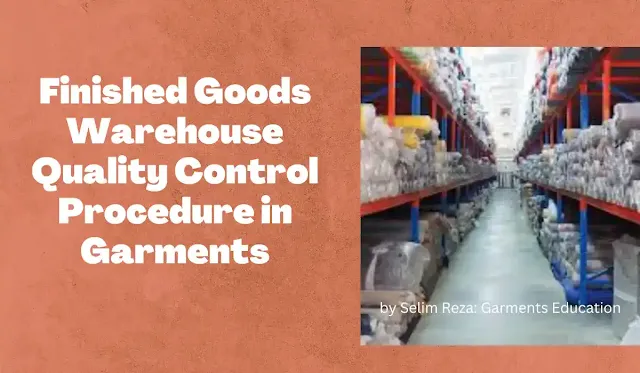
How to Control Finished Goods Warehouse

Quality Control in a Finished Goods Warehouse is crucial for ensuring that Garments meet the required standards before they reach customers. A robust Quality Control Procedure helps identify and address issues, maintain Product Quality, and prevent defective goods from being shipped. 


Finished goods Warehouse Quality Control Procedure in Garments


Here’s a comprehensive procedure for quality control in a finished goods warehouse:

1. Receiving and Inspection

a. Documentation Check:

  • Verify Documentation: Check all accompanying documents, such as packing lists, shipping notes, and quality certificates, to ensure they match the received goods.
  • Cross-Check Orders: Confirm that the quantity and type of garments received match the purchase order or production order.

b. Physical Inspection:

  • Visual Inspection: Inspect the exterior of cartons and packaging for any signs of damage, defects, or contamination.
  • Random Sampling: Select random samples from each batch or shipment for detailed inspection to check for quality issues.

2. Storage and Handling

a. Proper Storage:

  • Organize Storage: Store garments in a clean, dry, and organized manner to prevent damage and contamination. Use appropriate shelving or racking systems.
  • Maintain Conditions: Ensure that the storage environment is controlled for temperature, humidity, and ventilation to protect the garments.

b. Handling Procedures:

  • Train Staff: Train warehouse staff on proper handling procedures to minimize damage. Use appropriate lifting techniques and handling equipment.
  • Avoid Cross-Contamination: Ensure that garments are kept separate from potentially contaminating items, such as chemicals or food products.

3. Quality Control Checks

a. Size and Measurement Verification:

  • Check Measurements: Verify garment sizes and measurements against specifications to ensure they conform to the approved size charts.
  • Fit and Dimensions: Inspect the fit and dimensions to ensure consistency and accuracy.

b. Inspection of Defects:

  • Look for Defects: Examine garments for common defects such as stitching issues, fabric flaws, color mismatches, and incorrect labels.
  • Check Functionality: Ensure that functional elements like zippers, buttons, and pockets work correctly.

c. Label and Tag Verification:

  • Verify Labels: Check that labels and tags are correctly attached, correctly printed, and compliant with regulatory requirements.
  • Check Information: Ensure that labels provide accurate information such as size, care instructions, and composition.

4. Packaging and Preparation for Shipment

a. Packaging Inspection:

  • Check Packaging Materials: Inspect packaging materials for quality and suitability. Ensure that packaging protects the garments during transit.
  • Confirm Packaging Standards: Verify that garments are folded, packed, and labeled according to company standards and customer requirements.

b. Documentation Review:

  • Ensure Accuracy: Confirm that all necessary documentation for shipment, such as packing lists, invoices, and shipping labels, is accurate and complete.
  • Prepare for Shipment: Prepare garments for shipment by following established packing and shipping procedures.

5. Record Keeping and Reporting

a. Maintain Records:

  • Document Inspections: Keep detailed records of all quality control inspections, including findings and actions taken.
  • Track Defects: Record and track defect rates and issues identified during inspections for analysis and improvement.

b. Reporting:

  • Report Issues: Report any significant quality issues to the relevant departments, such as production or sourcing, for further investigation and resolution.
  • Feedback Loop: Provide feedback to production and design teams to address recurring issues and improve overall quality.

6. Continuous Improvement

a. Analyze Data:

  • Review Trends: Analyze quality control data to identify trends and recurring issues. Use this information to make informed decisions.
  • Implement Improvements: Implement corrective actions and process improvements based on data analysis and feedback.

b. Staff Training:

  • Ongoing Training: Provide ongoing training and updates for warehouse staff on quality control procedures and best practices.
  • Promote Awareness: Foster a culture of quality awareness and responsibility among staff.

7. Compliance and Standards

a. Adhere to Standards:

  • Follow Regulations: Ensure compliance with industry standards and regulations relevant to garment quality and safety.
  • Certification Requirements: Maintain certifications and adhere to quality standards as required by customers or regulatory bodies.

By Implementing and maintaining a Comprehensive Quality Control Procedure in the finished goods warehouse, you can ensure that garments meet quality standards, reduce the Risk of Defects, and enhance Customer Satisfaction.


Logistics & Inventory Management is Important

Logistics & Inventory Management are crucial functions within businesses and supply chains, playing integral roles in ensuring efficient operations, customer satisfaction, and overall profitability. 

Logistics & Inventory Management is Important


Logistics & Inventory Management is Important. Here are several reasons why logistics and inventory management are important:

1. Supply Chain Efficiency

Logistics and inventory management optimize the flow of goods from suppliers to customers, ensuring products are available at the right place, time, and cost. This efficiency minimizes delays, reduces transportation costs, and enhances supply chain responsiveness.

2. Cost Reduction

Effective logistics and inventory management help reduce operational costs in several ways:

  • Inventory Holding Costs: By maintaining optimal inventory levels, businesses minimize storage costs, obsolescence, and depreciation expenses.
  • Transportation Costs: Efficient logistics planning reduces transportation expenses through route optimization, load consolidation, and mode selection.

3. Customer Satisfaction

Timely delivery and availability of products are critical for meeting customer expectations and enhancing satisfaction. Logistics & Inventory Management Effective logistics ensure that orders are fulfilled promptly, reducing lead times and improving order accuracy. Additionally, well-managed inventory ensures products are in stock, reducing stockouts and backorders that can lead to customer dissatisfaction.

4. Strategic Decision Making

Logistics and inventory data provide insights into supply chain performance, demand patterns, and operational efficiencies. This information supports strategic decision-making processes such as inventory forecasting, supplier selection, pricing strategies, and expansion into new markets.

5. Risk Management

Proper logistics and inventory management strategies mitigate risks associated with supply chain disruptions, market volatility, and unexpected demand fluctuations. For instance, safety stock levels and alternate sourcing options can buffer against supply interruptions, ensuring continuity of operations.

6. Competitive Advantage of Logistics & Inventory Management:

Efficient logistics and inventory management contribute to a competitive advantage by:

  • Operational Agility: Responding quickly to changing market conditions and customer demands.
  • Cost Leadership: Offering competitive pricing through cost-efficient logistics and lean inventory practices.
  • Service Differentiation: Providing superior service levels, such as faster delivery times or flexible order fulfillment options.

7. Compliance and Sustainability of Logistics & Inventory Management:

Logistics and inventory management ensure compliance with regulatory requirements related to product handling, transportation, and environmental standards. Additionally, sustainable practices in logistics reduce carbon footprint and support corporate social responsibility goals.

Logistics & Inventory Management is Important
8. Collaboration and Integration Logistics & Inventory Management:

Effective logistics and inventory management foster collaboration among internal departments (e.g., procurement, sales) and external partners (suppliers, distributors). Integrated systems and processes enhance communication, coordination, and overall supply chain visibility.

Logistics & Inventory Management are critical components of business operations that optimize resource utilization, enhance customer satisfaction, mitigate risks, and contribute to sustainable growth. By investing in efficient logistics and inventory strategies, businesses can achieve operational excellence and maintain a competitive edge in dynamic market environments.